
This tutorial will make the Microbit do a pretend coin flip and tell you if it was heads or tail.
Flipping the screen
Rather than using a button press this time we’ll use turning the Microbit face down to make it do something. This will make a nice effect as when you turn it over it will reveal the result. The top side of the Microbit is the one containing the red lights, the yellow light is on the bottom side.
Like in the first tutorial drag “on start” and “forever” into the middle section to delete them.
Now click on “input” in the middle section and click-and-drag the block “on shake” into the blocks area.

Click on “shake” on the new block and pick “screen down” from the list that appears:

This block is a bit like “on button A” from part 1, but instead of doing something every time a button is pressed it does something every time the Microbit is turned over (or when something else happens if you pick something else from the list).
Click on “Basic” in the middle section, and choose “show number” and put it inside the block that is now “on screen down”:

Now put the program you just made onto your Microbit, just like you did in part 1.
Try flipping your Microbit so the yellow light is on top and then back over again. You should see “0” on the screen (made out of the red lights).
Randomly picking what shows
Select “Math” from the middle section and click-and-drag “pick random from 0 to 4” so that it replaces the “0” in “show number 0” – the pieces clip together like LEGO again, but this time sideways rather than vertically.


Click on the “4” in “show number pick random 0 to 4” and change it to “1”.

Now when you flip the Microbit (after putting the new program on it) it will show 0 or 1, randomly picking which one each time; it does something every time you turn the Microbit over.
Showing HEADS or TAILS
How about showing “HEADS” if the random number is 0 and “TAILS” otherwise. A block exists to do let you do that.
First drag “show number pick random 0 to 1” outside of “on screen down”:

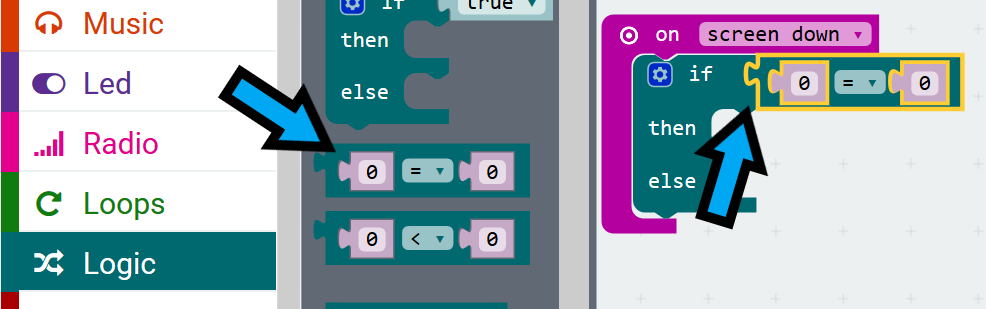
Click on “Logic” in the middle section and then click-and-drag the “if true, then …, else …” block inside “on screen down” (see the picture below):

To check if the random number is “0” you use the “0 = 0” block and change it a bit.
Click on “Logic” in the middle section and then click-and-drag “0 = 0” and make it replace “true” in the “if …” block:
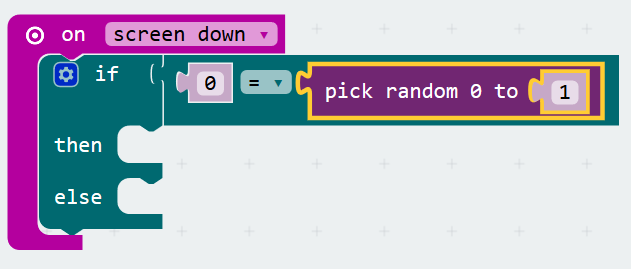
Now click-and-drag “pick random 0 to 1” from the “show number” we dragged out of “on screen down” earlier and use it to replace the second 0 in the block we just put in. If you’ve deleted the “show number” block, click on “Math” in the middle section, and replace the second 0 with “pick random 0 to 4” instead and change the “4” to a “1”.
Now click on “Basic” in the middle section and click-and drag “show string ‘Hello!'” inside the first empty part of the “if …” block if fits into. Then put another “show string ‘Hello!'” in the second empty part of the “if …” block:

Now click on the first “Hello!” and change it to “HEADS” and then change the second “Hello!” to “TAILS”.
And you’re all done…
…not quite…
…it would be much better to show a filled in circle for “HEADS” and an empty circle for “TAILS”. To do that:
First get rid of the “show string HEAD” and “show string TAILS” by dragging them onto the middle section.
Click on “Basic” in the middle section then click-and-drag “show leds” into the now empty parts of the “if …” block like you did with “show string ‘Hello!'” before.
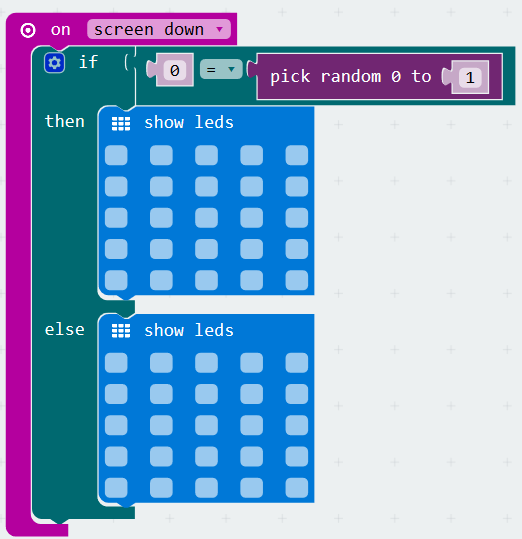
Each of the squares in “show leds” is a light on the Microbit’s display (the red lights). Clicking a square in the “show leds” block turns it red, and then when the program is run the lights matching those squares you’ve turned red will turn on on the Microbit.
Make the first “show leds” a pattern that looks like a filled in circle and the second one an empty circle pattern, something like this:
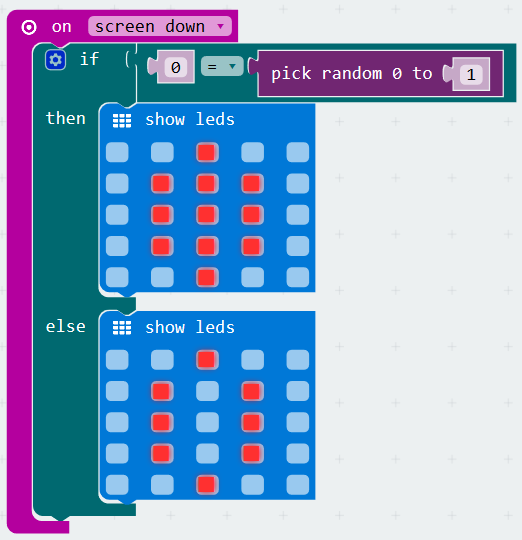
And that’s it. Put your program on your Microbit and try flipping the Microbit over.
Summary
You’ve learnt about lots of new blocks and made a program that doesn’t always do the same thing, which is cool.
The final version of the program can also be found here.