
Last time you created a game to test the player’s reactions. This time you will create a game of ping-pong to play on your Microbit.
Game blocks
In the middle section click on “Advanced”. A few more options will appear, one of which is called “Game”. You will be using several of the blocks in “Game” in this tutorial.
Setting up
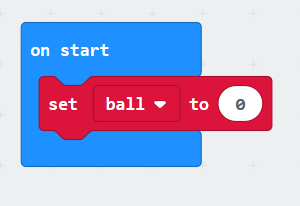
First create a variable called “ball”, and add a new “set ball to 0” block (found in “Variables” in the middle section) inside “on start”:
Now click on “Game” in the middle section, and click-and-drag the “create sprite at x: 2 y: 2” block and use it to replace the “0” in the “set Ball to 0” block:

You’ve just created a thing for the game. Things that appear on screen in a game are called sprites.
The screen is a grid, 5 wide and 5 tall. Each spot on the grid has a special reference of 2 numbers. The first number specifies which column and the second specifies the row. The columns (x) and rows (y) are labelled with the numbers starting at 0 for the first one, and ending at 4 for the last one.
So creating a sprite at x: 2, y: 2 puts it right in the middle of the screen.
The leftmost light on the top row is x: 0 and y: 0. So the rightmost light on the bottom row is x: 4, y: 4.
Making the ball move
Add a “pause (ms) 100” block and put it inside the “forever” block, and change the 100 to 300:

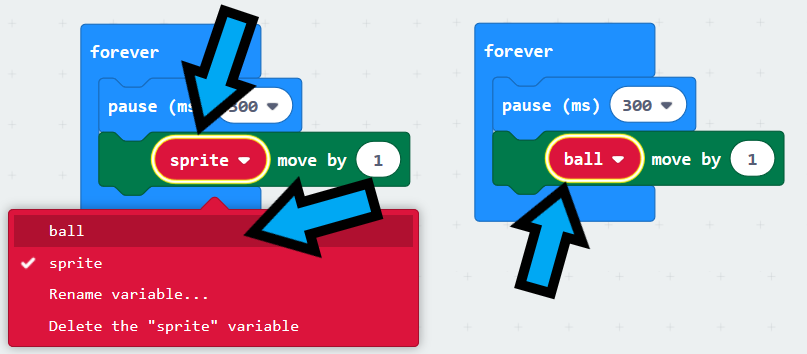
Now add a “sprite move by 1” block (found in “Game” in the middle section), put it just below the pause block you just added:

Click on “sprite” in the block you just put in, and select “ball” from the menu that appears:
You will notice that the light ball now moves every 0.3s, at least until it hits the edge of the screen. Put in a new “if sprite on edge bounce” block (found in “Game” in the middle section), and change “sprite” to “ball”, this block turns the ball around when it is at the edge of the screen:

Now the ball will move left-to-right and back again, forever.
For the game you will want it to move up-and-down instead. Add a “set sprite x to 0” block to the end of “on start”, and change “sprite” to “ball”, “x” to direction and “0” to “180”.

The ball has a direction which is in degrees, with 0 being up, 180 and -180 straight down, and 90 right and -90 left. If you don’t know how to use degrees don’t worry. This tutorial will give you the correct values to use.
Adding a bat
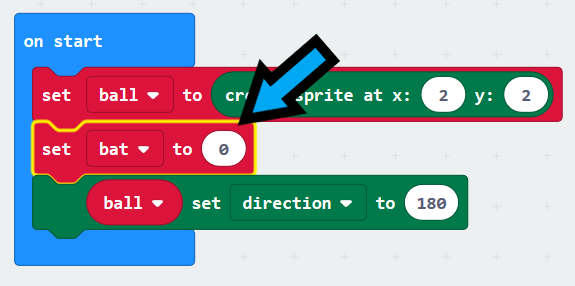
You need one more variable to store the bat sprite in. Create a variable called “bat” (found in “Variables” in the middle section).
Click-and-drag the “set bat to 0” block from “Variables in the middle section and put it just below the “set ball to …” block:
From “Game” in the middle section add a new “create sprite at x: 2, y: 2” block and use it to replace the “0” in the “set bat to 0” block, and change the second “2” to a “0”:

So that the bat looks different to the ball it’s brightness is going to be set differently. Add a “sprite set x to 0” block to the end of “on start” and change “sprite” to “bat”, “x” to “brightness” and “0” to “128”. The brightness is a value between 0 and 255, so it’s just been set to about 50% brightness.

To move the bat you will use the “A” and “B” buttons, with “A” moving it left and “B” moving it right.
Add an “on button A” pressed block, and put a “sprite change x by 1” block (found in “Game” in the middle section”) inside it, changing the “1” to “-1”.

Now add another “on button A” pressed block, changing “A” to “B”, and put a new “sprite change x by 1” block (found in “Game” in the middle section”) inside it.

The bat now moves when you press “A” or “B”.
Bouncing the ball off the bat
The blocks for this will go just after the “ball move by 1” block, as that is when the ball might be on top of the bat, so you need to make it appear to bounce.
Detecting the hit
Add an “if … then …” block (found in “Logic” in the middle section) and put it just below the “ball move by 1” block:
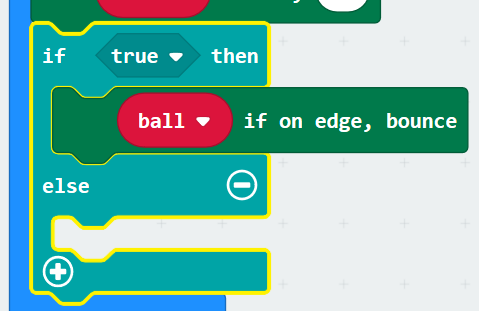
Click-and-drag the “ball if on edge bounce” and put it in the “else” part of the “if” block:

You need to check if the ball hits the bat (or goes on top of it). To do that click-and-drag the “sprite touching ?” block from “Game” in the middle section and use it to replace the “true” in the “if” block:

Change “sprite” to “ball” and fill the hole just before the “?” with “bat” (found in “Variables” in the middle section):

As this block checks if “ball” is on top of “bat” you need to move the ball back a step, so that it isn’t on top of it. Add a new “sprite move by 1” block and put it inside the first empty section of the “if” block, changing “sprite” to “ball” and “1” to “-1”:

Changing the ball’s direction
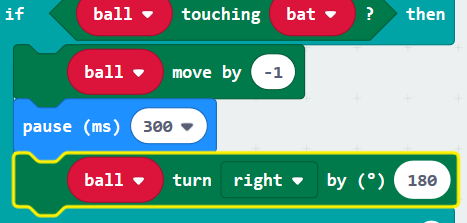
Add a new “pause (ms) 100” block and put it just below the “ball move by -1” block, changing “100” to “300”. This makes the ball look like it stopped to turn around.

You can reverse the direction by turning the ball 180 degrees with a “turn sprite by 180” block, however that makes the ball move the same way again, and again, and as it turns out, if you leave your bat in position it will often just hit the ball anyway.
To make it more fun it can be made to bounce in a random direction. Get rid of the “ball turn right by 180” block if you added it.
Create a variable called “random direction”, and add a “set random direction to 0” block just after the “pause (ms) 300” block:

Now click-and-drag “pick random from 0 to 10” from “Math” in the middle section and use it to replace the “0”, then changing the “0” to a “1”, and the “10” to a “3”.

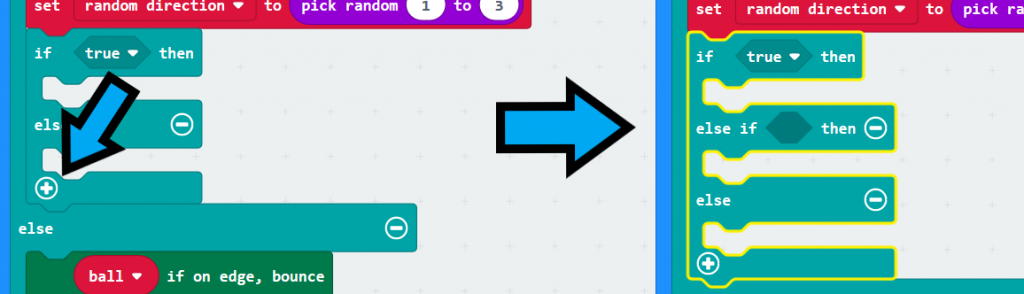
Now add a new “if true then … else …” block and put it just below the “set random direction …” block:

Click on the “+” at the bottom of the “if true then …” block:
There are three downwards directions the ball could take, down-and-right (-135 degrees), down-and-left (135 degrees), and down (180 degrees). Each section of the “if …” block will set one of them.
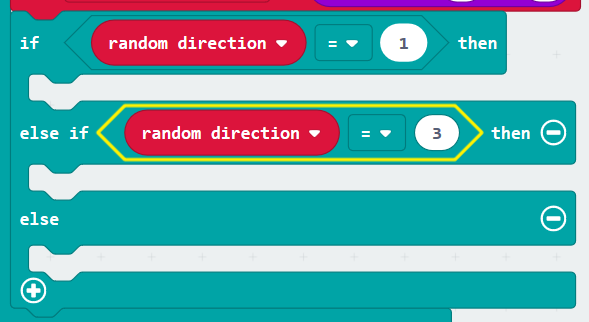
From “Logic” in the middle section click-and-drag “0 = 0” and use it to replace the “true” in the “if” block. Drag a second “0 = 0” and use it to fill the hole just after “else if”:

Now use “random direction” found in “Variables” to replace the first “0” in each of the “0 = 0”, and change the first remaining “0” to “1”, and the second remaining “0” to “2”:
Add a new “sprite set x to 0” block in each of the empty sections of the “if …” block, changing “sprite” to “ball”, “x” to “direction”, and the first “0” to “135”, second to “180” and the third to “-135”:

Keeping Score
In this game you will get a point each time you hit the ball with the bat. Keeping score when using blocks found in “Game” is done by adding a “change score by 1” (found in “Game” in the middle section).
Put a “change score by 1” block just below the “if …” block you added.

Game over
The game is over when then ball gets past the bat. This happens when the ball’s y value is 0, and it hasn’t hit the bat.
Click the “+” on the “if ball touching bat? then …” block:

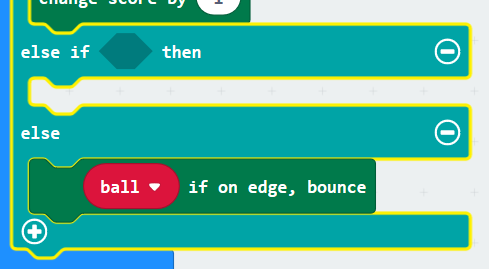
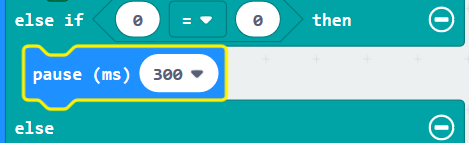
In the hole for the “else if …” part of the block, put a “0 = 0” block (found in “Logic” in the middle section):

Now click-and-drag a “sprite x” block (found in “Game” in the middle section) and use it to replace the first “0”, then change “sprite” to “ball” and “x” to “y”.
So that the player has a moment to see the ball hit the top, add a “pause (ms) 100” block, changing “100” to “300”, inside the “else if … then” section:
Finally clip a “game over” block (found in “Game” in the middle section”) just below the “pause (ms) 300” block:

Conclusion
That’s it. The “Game” blocks will make sure the score gets printed when the game ends.
The completed game can be found here.